Sunday, October 23, 2011

Fall Flavors: Fresh Pumpkin

Fall brings with it an insatiable desire to bake treats laced with the warm, comforting flavors of fall.  (Okay, so the urge might be to eat these delicious desserts rather than make them.)  One of the most prominent autumnal flavors is pumpkin.

Somehow every year Libby makes horrifying cries of pumpkin shortages.  You have nightmares of visiting every supermarket in town, searching for pumpkin and imagine Thanksgiving without pumpkin pie, and Christmas without pumpkin roll.  You worry about the cost of pumpkin with supply short and demand high, wondering who will be cut from the Christmas gift list to put pumpkin back on the menu.  Okay so maybe it's not this dramatic, but you can save yourself a lot of headache and stress over pumpkin shortages (and get a better tasting, fresher, and local product) by making your own pumpkin puree.

Roasting pie pumpkins is easier than it sounds.  Trust me.

Selecting Your Pumpkin
Many local farmers markets and have a wonderful selection of pie pumpkins.  Many people use these cute little pumpkins for decoration, but inside lies a sweet, fresh, delicate flesh- perfect for satisfying those fall cravings.

Darker pumpkins that have some speckles on them are sweeter.  If you are not planning to cook your pumpkins soon and intend to store them for a while, check them thoroughly for nicks and soft spots, as this is where rotting will begin.  Don't forget to check the bottom and around the stem.

If you have a cool, dry place such as a fruit cellar or cool garage, you can store whole pie pumpkins. Stored in these conditions they can keep for a while (at room temperature a couple pumpkins lasted about only two weeks on my kitchen counter).  Washing the pumpkins (or any fall squash) before storage can help extend the life of the squash extensively.  My uncle swears by a light bleach solution, saying he has stored squash into the spring and early summer using it (although sources say pumpkins will store for 2-3 months).  The solution should be 1 part bleach to 10 parts water.  And the bonus of this- extra freezer space and pumpkin seeds in the middle of winter!

Roasting Your Pumpkin
Preheat the oven to 375 degrees.  Cut your pumpkin in half, scoop out the seeds and pulp (save the seeds for some awesome cinnamon or spicy pumpkin seeds).

Pour some water onto a baking sheet and place the pumpkin halves with the flesh side down and outter skin facing up.
Bake the pumpkin for an hour or until a knife is easily inserted, meeting little resistance (like making a baked potato).

Pureeing the Pumpkin
Once the pumpkin has cooled enough to handle, peel the skin from the pumpkin and break into chunks.  Drain the pumpkin in a colander, then process the pumpkin in a food processor until smooth.  If the pumpkin is still watery after it sits, skim off the water.


Storing Pumpkin
My grandparents always canned their puree, but there are a lot of variables that go into packing an non-acidic food that can make it unsafe.  However, the puree can be frozen in ziplock bags or containers.

Next....make some cake!  Bake a pie!  Mix up a pumpkin roll!  Cook some pumpkin soup!
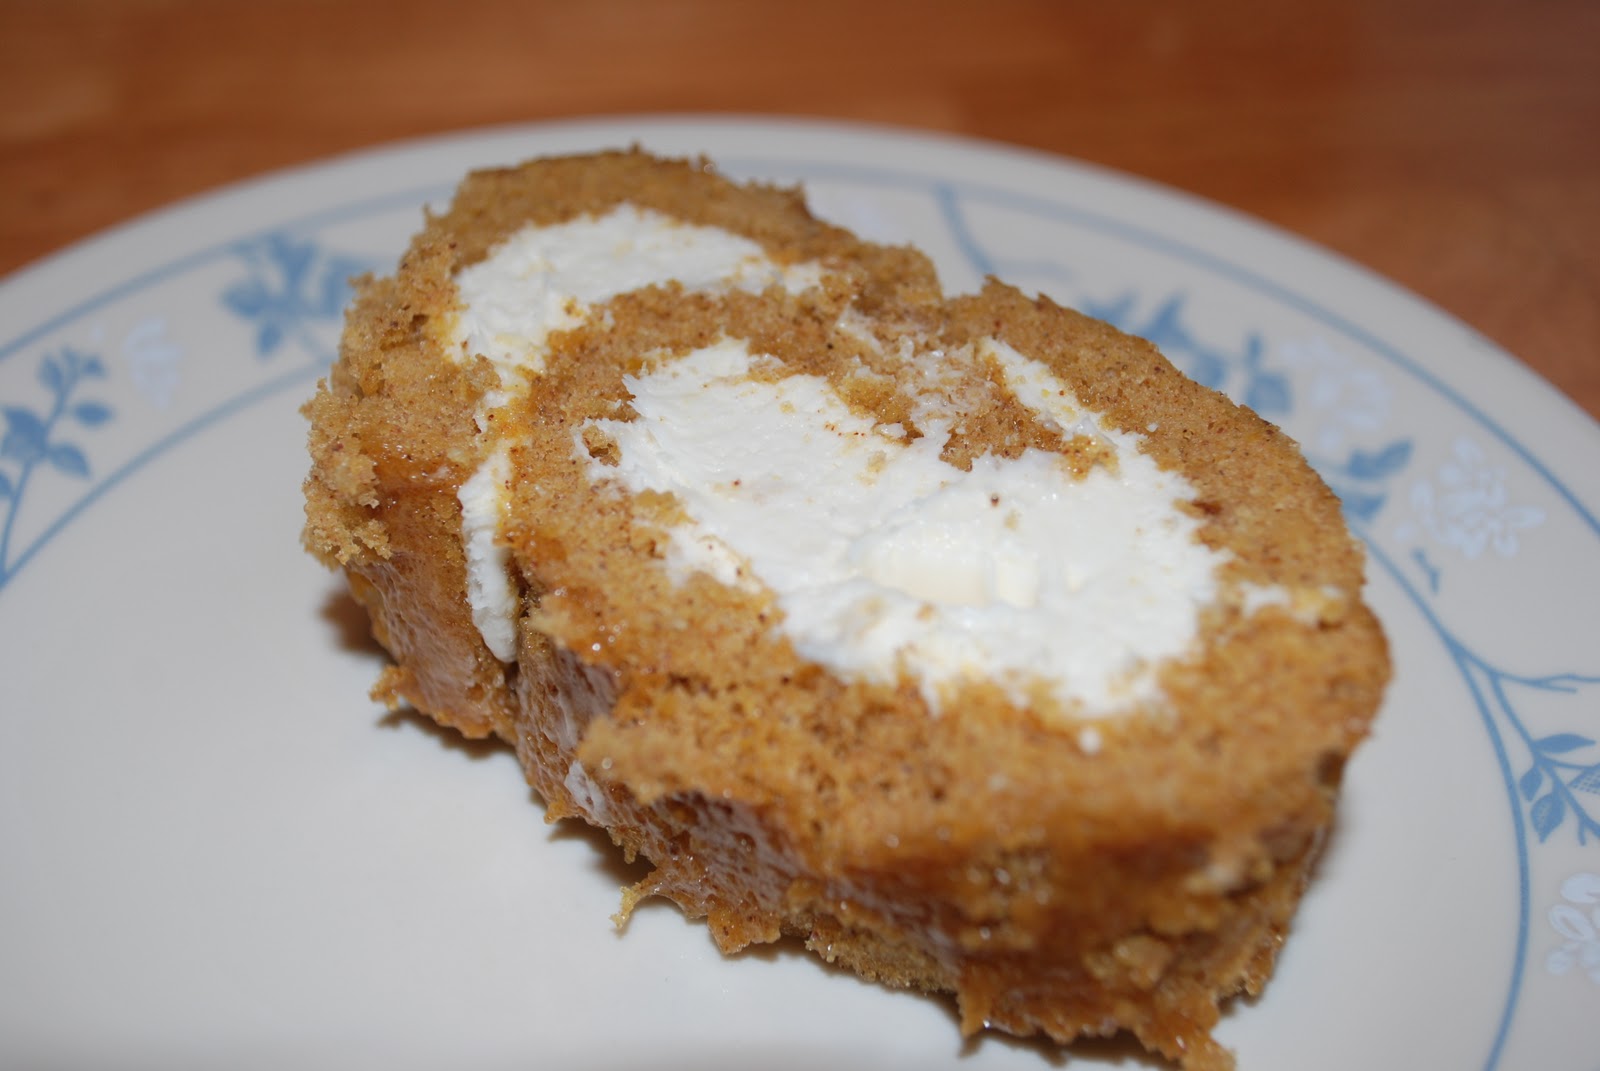
Sweet inspiration...


And if tasting this pumpkin and the fresher flavor of your fall favorites isn't enough, the two pumpkins I roasted ($1 each at Molnar Farms) made just over two pounds of puree, bringing the cost of pumpkin to about 6 cents per ounce as compared to Libby's at almost 14 cents per ounce!

What is your favorite pumpkin recipe?

Tuesday, October 18, 2011

Spooky Sweet Treats: Halloween Cupcakes

I am not sure where summer went, but sure enough fall is here.  I feel I have neglected you, dear readers, and thus in the waning hours of National Chocolate Cupcake Day, I bring you a handful of wonderful Halloween cupcake ideas, with plenty of time left to make them for Halloween.


"Mummycakes"
I made these by spreading a thin layer of frosting over the entire cupcake.  Then I spread some black frosting over the spot where the eyes would go (brown or chocolate frosting would also look good and may not bleed as black tends to do after a while).  I used a #44 tip (you can also use a basketweave tip with the textured part facing down and flat side up) to pipe lines across the cupcake, leaving room for candy eyes.  If you don't have candy eyes, just pipe some white with a larger round tip and then black with a smaller round tip.


Spiders
These were the most popular of my cupcake tray.  I piped the base white with a 2D tip and added Oreo crumbs on top for texture.  I then cut long black licorice strips into pieces about 2 inches long, slid them into the frosting between the layers of the Oreo and attached candy eyes with a dab of frosting.  If you don't have candy eyes, pipe some white and add mini m&m's or a dot of frosting for the center of the eyes.

Melted Witch Cupcakes
Rejoice!  The Wicked Witch of the West is dead!  I made the witches hats with a Keebler's Fudge Stripe cookie turned chocolate side up with a chocolate kiss on top.  I piped a bow with a small writing tip and placed on top of a swirl piped with the same 2D tip as above.

Pumpkin Cupcakes
I made these cupcakes by frosting a pumpkin cupcake flat in orange.  I angled my spatula to add some lines up the sides of the pumpkin.  Then I placed the "stem" (an inch-long piece of pretzel rod dipped in chocolate) in the center and piped vines and leaves.

Batty Cupcakes
The bat is a Wilton candy mold that is a pick that sticks in the cupcake.  I molded the bats with Merkins black chocolate (which amazingly tastes like Oreos) and placed the picks into the cupcakes after topping the cupcake with the 2D tip and adding some festive sprinkles.


Some other inspiration I found after-the-fact:

Which are your favorites?

Monday, September 12, 2011

My Secret Ingredient Revealed

Perhaps I just need to get this out of my system so my boyfriend, family, and friends don't have to listen to me obsess over it so much.  But it's just that good, I want to shout it for all of Youngstown to hear, and beyond.

Mexican vanilla is amazing.

I'm just out of school, and with student loans and a car payment, I try to save as much as I can.  I don't always buy the absolute best (read: expensive) ingredients, when I know I should, but I never thought anyone would know the difference.  If I couldn't tell, how could I expect anyone else to?

That was until I bought Mexican vanilla.

Vanilla comes from orchids.  Who knew something so pretty could make something so delicious too!

Until now I'd been buying vanilla extract from Sam's Club, GFS, and local bulk food stores.  When my boyfriend and I went to Cozumel on a cruise this spring, I indulged myself with an enormous bottle of Mexican vanilla (32 amazing ounces).  After all, in Mexico it was only $8 (a steal from the $7 I'd been paying for 16 oz).  (You can buy Mexican vanilla online cheaper than in stores--especially if you're buying in bulk, but it's still more expensive than Tone's or GFS extract.)

I came home and opened it- it smelled like heaven (smelling it felt like vacation- a much more mild smell than any other vanilla extract I've used.  The delicateness of the smell and the fact that the extract did not smell like alcohol let off a complex aroma, and I was hooked). I even considered taking a shot of it just for fun. I started using it here and there, in brownies, cookies...everyone said it was good and I thought it tasted good, but I didn't think it was anything too spectacular.

The first time I really noticed an impact on flavor was when I made my niece's baptism cake.  It was the first cake in which I'd made using Mexican vanilla- a white cake filled with custard and frosted with a rich Italian meringue buttercream frosting.  As I sat down and had a piece of my cake, for the first time I thought, "Damn, I make a great cake!" and marveled in the simple, yet fantastic, flavor I was experiencing.

Mexican vanilla was the little something that my baked goods had been missing.  It's most noticeable in lighter items and those items that rely mainly on vanilla for flavor, such as frostings and vanilla ice cream.  It's a much more complex and not so much bold, bringing simple baked goods to life.

Since Mexican vanilla is more expensive, I recommend using less expensive vanilla extract for items where vanilla is meant to compliment a flavor, such as brownies and chocolate ice cream.  Use Mexican vanilla for delicate items that rely on vanilla for flavor- fillings for clothespin cookies, vanilla frosting, vanilla ice cream.  It's worth it.

What is your secret ingredient?

Monday, September 5, 2011

A Stitch In Time

This past weekend was our county fair, and Saturday I had lots of free time to go around to the arts and crafts exhibits (which I'm sure my boyfriend was glad to get out of this year, as I was equally glad to not be drug on to the next exhibit before I was done gawking at admiring the intricate and beautiful work submitted).

The sheer amount of entries and the quality of the work is absolutely amazing.  To know that there is this much talent in our community is just amazing.  And the work is inspiring, because most of the pictures submitted are by amateurs, and most of the quilts, baked goods, and other crafts are done just as hobbies.

As I strolled through the quilts, I came across the most moving and interesting quilt I've seen yet.  (I apologize that I didn't snap a photo of the quilters' names, so if you recognize the work and know the quilter, by all means please let me know so I can give credit).  These woman really put a new spin on the t-shirt quilts that have been hitting the scene.

The story about the quilt was printed next to it (again I didn't happen to snap a picture so I don't have all the details)- the quilt was made from shirts and the inspirations left by a gentleman who lost his battle to cancer, but not without touching many lives.  A group of women put together this quilt for his son, incorporating t-shirts, button-up shirts, the collars to shirts, and the pockets to shirts.  The quilt was truly inspired by this man's spirit, but the one thing that drew me to the work was the quilting- the women stitched quotes from this gentleman, and (what initially made me notice the quilt and read the story) hands.

These women stitched the hands of people whose lives this man had touched, and sewed the cuffs of his shirts at the wrist.

At the end of the fair I was left inspired by two amazing ideas: fried cookie dough (the best of both worlds- warm, gooey chocolate chips and soft, doughy goodness) and the stitching on this quilt.  I became obsessed with this idea, and after talking about it for the past two days, I came up with another idea, one I'm planning on doing with my sister-in-law for my nieces.  We are going to trace the girls' hands every year (or maybe even using some of the rough tracings they'll make of their own hands in a few years), as well as saving some of their shirts to make a quilt showing them as they've grown.

Unfortunately, we're going to have to wait about 16 years to see the results, but maybe someone out there has copies of traced hands from their own children and would like to do this with them (which I'd love to see).

Another meaningful keepsake would be to stitch several children's/grandchildren's hands, one way to avoid waiting 18 years to make a beautiful quilt.

What are the most meaningful keepsakes have you made or received?

Tuesday, August 16, 2011

Pedal to the Point 2011

Again, I've been a little absent, but this time with a much more acceptable excuse.  I haven't been crafting in the past few weeks because I've been spending my free time doing some last minute attempts at training for the 2011 Bike MS Pedal to the Point, a two day, 150-mile bike ride from Middleburg Heights to Sandusky and back.  The event is organized to help raise funds for the National MS Society and to raise awareness about MS.

Despite my lack of serious training (once or twice a week at around 9 miles each time, with about 16 miles being my furthest ride), and with my 'hardcore' equipment (a teammate's old mountain bike we got looked over and a helmet), I set off with my team Friday night for a weekend that would challenge me and leave a huge impression on me.  I can't stop thinking about it.

Friday night we lived it up with a hearty dinner at Max & Erma's and plush beds in a suite at a hotel near the start of the race, complete with funnel cake fries and an animated story time of the biker's handbook they sent out a couple months ago.

I was nervous as we began on Saturday, but was amazed at the response the event draws.  Hundreds of bikers stretched and started out, as family both of the riders and of those living with MS cheered us on.
Before the ride

Not only did the event draw bikers, but volunteers were everywhere.  From handing out bananas and peanut butter at rest stops (neither of which I wish to see for a while), to driving their own vehicles as support vehicles (SAG vehicles) for the riders who are in need of assistance throughout the course, I was amazed at how many people were involved in the event.
Bikes on the tennis court at Sandusky High School waiting for another 75 miles in the morning...

After completing 75 miles on Saturday, we camped out on the Sandusky High School gym floor (which was surprisingly quiet- no one even snored!) and got up to face another 75 miles.  Sunday was cold and brought a lot of rain.  Water sloshing in our shoes and wearing sails, er, I mean ponchos, we made our way through the rain.  I completed over 100 miles of the ride, with the total team miles traveled reaching over 570!

The kindness of every single person I encountered was incredible.  Each time we were stopped on the side of the road, whether it was just for a drink of water, to give our sore back ends a stretch, or if you popped a chain, several riders and SAG vehicles would ask if you were okay, and stop if they thought you needed some assistance.  The community created among complete strangers was moving.

The one thing that stuck with me most was the Craig's Crankers team (they also have a facebook page).  As we approached the team, a mob of vibrant yellow shirts, I thought "This is amazing- this whole team is riding together."  We pulled left of the team to pass them and at the head of the team was Craig, cranking his way through the course in a hand bike.  Later I learned that Craig has MS.  And seeing this cemented the feeling that the whole event gave me- we are all working together one way or another, from those financially supporting the teams, to the riders, to the people handing out energy bars and Gatorade at rest stops- we are all working together to make the lives of those affected by MS easier, and to one day have a cure.

I'm so proud of myself and my teammates!  Way to go Jill's Jaunters!  And thank you to everyone who supported us, both financially and through encouragement. I invite you to join the movement, whether it is through financial support, moral support, or riding yourself next year (you can do it!). Here are links to our team fundraising page and an article about our team captain, Megan Molnar and her mother Jill, who, despite MS, has such a beautiful spirit and whom I find absolutely incredible.

Thursday, July 21, 2011

Greetings from my Stamp Collection!

Greetings!  (Again) So I know I've been a little MIA the past couple weeks.  I could tell you all sorts of excuses- I cut off my communications from the outside world to prevent creepers stalking me, I've been on stake-out at my garden 24/7 keeping away skunks and deer, or I was just plain lazy/forgot.  I'll let you determine which you think is the truth.

This post is about greeting cards.  When I started to get involved with scrapbooking, I started making greeting cards as a way to save money.  I don't care who you are or how important you are to me, I just can't bring myself to spend $3 ($3!- that's a margarita at happy hour- don't worry, I'll be thinking of you!) for a piece of paper to which I'll sign my name, you'll tear open, read once (maybe twice), and set aside (or worse- throw away!), never to be seen again.  (However, I might splurge if I've already been to happy hour and the card is really funny).  And let's face it, I don't have a history of being much of a planner, so I love being able to go downstairs on someone's birthday or the day of someone's wedding and graduation and emerge fifteen minutes later with a card in less time than it would take me to go to the store. (And my boyfriend always wondered how I could stand last minute plans!).

I started with a few stamps from the dollar store...then I noticed that JoAnn's, Michael's, and Pat Catan's all had cheap stamps.  Really cheap stamps.  So I began a collection.

Some call it more of an obsession...
 You'll have to dig through the bargain bins near the registers for the stamps, but they change every couple of months or so, so there's always something new and exciting.  Here are some of my most recent creations using the latest batch of stamps at JoAnn's:
There were plenty more.  I just have to limit myself or else I'd be drowning in these things.

I just loved the camera.  I'm thinking of "...because you deserve to" inside

At first I wasn't really sure what I wanted to do with these word-y stamps.  They just seemed so busy.  But I loved them as a background, either as an entire card or for just blocks on the card.  The clear stamps and block make it easy to line up the stamp to look seamless in its repetition.  The birthday stamp was a little more difficult to line up than the thank you one, but once you add the focal stamp to it, you can't really tell that the spacing is a little off.


I also "discovered" sewing on cards in a card magazine.  I'm pretty sure this is nothing new to those who follow the cardmaking world, but I want to share that it's not half as scary as it looks!  I'd like to share some words of advice when sewing on cards (in the whole three or four I've made thus far):


Most importantly, (if you take anything from this post it should be this) make sure the card is open before sewing.  It's a real downer to have to throw away all of your work (because let's face it, a needle is like lightning, never hits the same place twice- you're not going to get it to line up with the holes you already sewed through your paper).  Not that I've been absentminded enough to do this or anything.  I could just imagine that it would be sad to ruin your work like that.

Loosen the tension on your machine.  You don't need to do it much, just enough so it won't pucker the paper.

Lock your stitch if possible.  The thread comes out very easily if you tug even the slightest bit on it.

I have yet to recommend sewing squares.  I haven't been successful in making even borders, with the stitches always being a little shorter or further, never just right to make that perfect, square corner.  My solutions- zig zag stitches, having a backup plan to cover up an uneven corner, or to avoid them altogether. (Does anyone else have any advice on this?)

My favorite thing about making my own cards is that they are so personal.  You aren't limited by the sentiments Hallmark prints, or the color schemes in American Greetings' cards.  I plan to fill these cards with sayings or quotes that I will print on cardstock or vellum and fasten inside.  They have dimension, personality, and they won't force you to give up happy hour!

Sunday, July 3, 2011

As American as Apple Pie...

Disclaimer: this post is not about America (unless you consider the fact that I am in America, then it is).  Or apples.  Or apple pie.  It is, however, about making pie.

I am no expert in the pie field.  I can count on one hand how many pies I've made on my own, and probably two hands (and maybe a foot) how many pies I've participated in making over the years.  I do not claim to have experience and extensive knowledge (or even adequate knowledge) in the field.  The pie baking in the oven is the collaboration of my determined wild black raspberry picking, my boyfriend's mother's knowledge in baking black raspberry pies, and my mom's assistance in mixing the crust (after two failed attempts on my part).

Needless to say, with my limited experience I'm willing to take anyone's advice and seek assistance when making a pie (especially with such precious black raspberries!).  So when my mom raved about this pie crust maker she got a while back, I decided I'd give it a shot.

Harold 11" Pie Crust Maker
A simple enough "invention"- just roll the dough between the plastic.

The concept was simple enough- roll the dough out between the plastic, unzip the case and flip the crust into the pie pan (awesome! I wouldn't have to roll the pie crust over the rolling pin to transfer it, something that for some reason always makes me nervous).

The first attempt proved that I did not put enough flour in the pie crust maker, and the crust stuck to the plastic and tore as I tried to peel it out.

Even with more flour (lots more flour) on the second attempt, you cannot get enough flour on top of the dough.  The crust does peel away from the top layer of plastic if you are patient and pull the plastic away from your rolled crust slowly.  (To avoid this you could open it up and put more flour on as you roll, which makes it more time consuming with constant opening and closing.)  But there was enough flour to make the crust come off the bottom of the plastic easily.  Taking a deep breath, I flipped the crust into the pan, the crust landing in a messy pile in the dish, folding into itself and sticking together.

Needless to say, I became more nervous about the various aspects of using the pie crust maker than in the task of rolling it out without any snazzy tools.  Would it stick in some random place and put a big tear in the crust?  Would it fold into itself as I flipped it into the pan?  I feel much more in control of the crust when I roll it out on the counter, shifting the dough to make sure it's loose on the bottom and adding flour as I need it on top.  I'd rather roll the crust over my rolling pin and drape it over the pie dish from there.  And the extra items to wash were also a downside.  All in all, I felt that the pie crust maker was more trouble than it helped.

Has anyone else tried the pie crust maker?  What is your preference?