Wednesday, July 31, 2013

Sewing the Straight and Narrow

Pre and Post- sewing solutions
Full disclosure here: I am by no means an excellent seamstress. Yeah, I've done some really nice projects, like footie pajamas and aprons but most of the time I start guessing the correct way to do things and I'm sure I end up breaking several unspoken sewing commandments.

 I always tell my fiancé that sewing is like driving- just press the pedal and steer straight. Well, to tell the truth if a sewing machine were a car I'd be pulled over doing field sobriety tests just pulling out of the driveway.

Thats right- I don't sew a straight line all that well  And most of the time, you wouldn't notice. I barely even noticed myself. Usually I'm sewing pajamas or other simple projects like aprons for my nieces with wide seam allowances with nothing in the project that amplifies my impairedness. So when I chose to make an optical illusion quilt (from this book), I learned just how drunken I seemed at the helm of my machine.

The quilt I chose requires sewing several long strips together, then cutting those blocks into strips and sewing them together another way. Some of these strips are nice and wide and quite forgiving to small errors. However, some of the strips are as small as 3/4". With 1/4" seams on both sides. Even taking too big of a breath while sewing can show on these areas of the blocks. 

The book has really good descriptions on how to cut very straight strips (another thing I didn't realize I did unsuccessfully).  It's a little tedious, but certainly plays into getting straight seams.

For sewing a straight seam, the author suggests using mole tape to guide your seams, placing it 1/4 inch from the seam.  However, I didn't want to go looking for mole tape (although it's probably easy to find at a pharmacy).  I was also afraid of it making my machine sticky or marking it, as well as the inconvenience of removing it and putting it on again if I changed projects (looks like I finally accepted the fact that my projects take me uh, just a little longer than planned, and maybe other things would get thrown in there in the meantime).

Needle moved over- you can see it doesn't line up with the red center mark anymore
My fiancé's mom suggested I use masking tape at the 1/4 inch mark, since it wouldn't mark my machine and I wouldn't need to remove it.  I tried this, but still didn't seem to get a very straight seam, since I couldn't really see the edge of the tape all the time.

Another suggestion from my fiancé's mom was to move the needle.  Sure enough, with a piece of graph paper I was able to determine that I needed to move my needle over 2.5 to the right to get a 1/4 inch seam along the edge of the plate.  For a little extra speed, I use my finger to help guide the seams.

Hopefully I'll have a completed project before we need a blanket again...

What tricks do you use to ensure straight, narrow seams?

Thursday, May 23, 2013

Easy DIY Elmo Apron

My niece loves Elmo.  I try to make them aprons every year for Christmas (yes, this post has been in the queue for quite some time).  I didn't like any of the licensed fabric (okay, so maybe I didn't like the price of the licensed fabric...) and wanted something really fun for her.  So I decided to make my own Elmo template.
Photo from my sister-in-law

You will need:
Red apron
Small pieces of orange, white, and black fabric (thanks to our school mascot for being a tiger, I had scraps of all of these)
Some iron-on backing, whichever you prefer


1. Start with a print out of Elmo- I did a Google image search for Elmo and used the search tools to find a line drawing of just his face.  I copied the image to a publisher document and stretched it to fit an 8 1/2 x 11" piece of paper.  It's okay if the sides of his face are cut off.  You only need his eyes and mouth on one piece.


2. Cut out the pieces of Elmo's face. Fuse your backing to the pieces of black, white and orange fabric, ensuring you have enough space for each of the pieces on their appropriate color fabric.  You really don't need much.


3. Trace the pieces onto the backing.  Note: I did not flip the pieces when I did this- it didn't make a difference for Elmo, but might make a difference in other characters.  Remember you are tracing to the BACK of your material, so if you decide to do letters or something else with this same technique you will need to flip your paper over before tracing (or if you're tech savvy, flip it  on the computer before you print it).

4. Line up your pieces.  I used the white cutout to make sure the eye and nose pieces were centered.


5. Iron on according to your fusing material's instructions.


That's it!  I thought about stitching along the edges, but the fusing material held pretty well.  Another option would be to use puffy paint to outline it, but I thought it looked just fine without any extra work.  So easy and my niece was soooo excited about the apron!


Monday, September 17, 2012

Dreamy Red Velvet Ice Cream

So as my ice cream maker churns away it hits me that summer is nearly over and I realize that I've been hiding something - not intentionally by any means.  I haven't shared my ice cream making with you!

My apologies my friends. In order to make it up to you I promise you another ice cream post next weekend after our new creation that is in the works is unveiled.

I can already sense the excitement and sleepless nights awaiting you like a young child the week before your first ever day of that magical thing called school. I promise it will be as exciting as That first day when you discovered all the cool people who wanted to be your friends. And feel nothing like that dread that followed later as they assigned homework for your most loathed subjects.

So now that you're thoroughly excited and will be unproductive at work constantly checking to see if I reveal the secret early (sorry but I won't), let's move onto my closet ice cream making.

Red velvet ice cream.

Oh yes. I did.

Red velvet ice cream has been on my mind since January. I didn't want just to add chunks or crumbles of red velvet cake to an incredible vanilla base I wanted a richer, smoother, more delectable ice cream. (And, let's face it, I was too lazy to bake a red velvet cake and THEN make ice cream...although I know others wouldn't have complained about the extra dessert that would need to be eaten...)

And boy did I find it.  Rich, creamy, mind-blowing red velvet ice cream.


Red Velvet Ice Cream

(recipe taken from here)
Ingredients

2 cups heavy cream
6 egg yolks
3/4 cup sugar
1 cup buttermilk
2 tablespoons unsweetened cocoa powder
1 tablespoon red food coloring
1 teaspoon white vinegar
1 teaspoon Mexican vanilla extract

Directions
Bring cream to a simmer in a medium saucepan.  While the cream is heating, whisk together the egg yolks and sugar.  Once the cream has reached a simmer, temper the eggs by pouring some of the hot cream into the egg yolks while whisking.  Add this mixture into the pan, again while whisking (tempering the eggs as such will keep any of the egg from cooking too quickly and help to avoid producing clumps of egg).

Cook the mixture over medium-low heat, continuously stirring until the mixture is thick enough to coat the back of a spoon.

You should be able to run your finger through the mixture and it leave a path on the spoon

Remove from heat.  Stir in the buttermilk, cocoa powder, food coloring, vinegar, and vanilla extract [after some reflection after making this I think the best way to do this would be to mix the cocoa powder with a small amount of buttermilk until smooth- if you add it directly to the pan you will end up with several clumps and will spend an unnecessary amount of time breaking up the cocoa powder clumps.]

Pour mixture into a container and cover with plastic wrap (make sure the plastic is touching your custard to keep from forming a film on the top of the mixture).  Chill for at least 4 hours (I chilled mine for about 24) before freezing. (A thoroughly chilled mixture will produce a smoother ice cream as the crystals will be finer). Freeze according to your ice cream maker's manufacturer's directions (it takes about 25-30 minutes in my Cuisinart 1.5 quart ice cream maker).  Transfer to freezer safe container and allow to firm (if you can wait!).

Heavenly Red Velvet Ice Cream


I think next time I make this I would like to try adding cheesecake chunks...yum!!

Friday, August 31, 2012

DIY Footie Pajamas

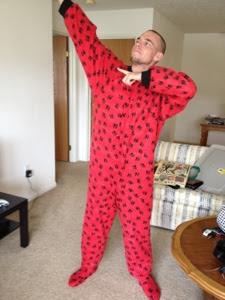
So I finally finished another project off of my list.  My super secret belated Christmas/birthday (okay, now belated birthday gift too) was a pair of pajamas for a friend. (And, if you're anything like me and it takes forever to finish a project in the limited free time you have, you're already late if you want to make a pair of these for Christmas.)

These new pajamas are not just any pajamas.  These pajamas are a one-of-a-kind pair of footie pajamas.
Excitedly awaiting cool nights to wear these awesome jammies.

For well over a year, I've known that my fiance's friend has wanted footie pajamas.  So on Black Friday, I found some material (the puppy paw print made sense at 4 am) and found my patterns.  There was no pattern for footie pajamas, but my mom discovered a one-piece pajama pattern, and my sister-in-law who is into costuming was buying a pattern for fabric shoes.  Perfect combination.

So I'll walk you through the process describing the alterations I made to the method.

I began with McCall's pattern M6251 (jumpsuit) and Butterick pattern 5233 (footies).

I cut out the pieces for Jumpsuit E from the M6251 pattern.  I cut all the pieces as directed, but cut the neck binding (piece 13) from the same binding material as the sleeve bands (this was done from a personal preference to have this instead of using the same fabric).  You do not need the leg band (piece 15) as you will be attaching the footies.

For the footies, cut the pieces for footies E (you do not need the fringe piece- piece 11 or binding).  On the back piece (piece 9), I did not cut the notch in the back, but rather cut straight up from the bottom piece since I would be sewing the whole thing together instead of having an open-backed tie shoe.


Follow the jumpsuit directions from 1-10.  I skipped step 11 because I  thought it looked nicer without the neck binding folded over since I used the rib binding.  So I just tucked the edges in and tacked them to the collar to give it a finished look.

Continue with steps 12-15.

Move on to the footies.  Follow steps 35-38.

With right sides together, pull the footie over the outside of the leg, lining up the center of the top of the foot with the notch on the front of the leg.  Sew this together.


Pull the leg so that the whole thing is inside out.  Sew the sole to the bottom, following steps 45-46.


After I was finished I put my feet in to make sure they would work (I wasn't sure what shoe size he was but was convinced it was bigger than mine).  I was a little nervous because the feet weren't really big on me, but the fabric had some stretch to it and it worked just fine.

Other words of advice: be careful not to stretch your ribbing too much as it doesn't recover well and will be permanently stretched (another option would be to cut a little smaller to allow for some stretching).

The only other thing I'd consider doing differently is putting something a little more slip resistant on the soles of the feet (my sister told me they make iron on stuff for this? Amazing idea!).


Perhaps the next pair should have a hood on them too.  Or an old-fashioned flap in the hind end, just for giggles.

Monday, June 25, 2012

Baby Bouquet

A little while ago (okay I guess it's been a couple months now) we had a baby shower for a coworker.  We had food and games (and adorable cookies!) We wanted to give her something in addition to the awesome food and excellent company and fun games. Something simple and yet cute. Enter the baby bouquet.

To make a baby bouquet you will need:
Baby washcloths (I also used some burp cloths but I liked the flowers made by the washcloths better)
Tape
Greenery (and Skewers- optional) (the skewers were really helpful with the heavy burp cloths.  I got this particular greenery from Dollar Tree and it eliminated the need for floral skewers for the wash cloths)
Vase
Tissue paper


Directions:
Fold baby washcloths


These ones actually were folded pretty nicely to begin with.  They ended up being folded in quarters.


Do as I say not as I do: tuck in the tag before rolling...


Place the skewer (or greenery if yours is able to act as a skewer as this one) at one end of the wash cloth.  I moved the greenery down so it would be out of the way while I rolled the flower.


Roll the washcloth slightly toward the lower edge to layer the rose.

...or begin rolling at the end with the tag.


Tape the end to hold the flower in place. Cover this tape with floral tape and push up the leaves closer to the flower.


Place the flowers in the vase (if your vase is plastic you may want to put something weighted in the bottom to keep it from being top heavy and tipping over). Add greenery to fill out the vase, particularly if using skewers.

Add tissue and add a bow to the vase if desired.

And now your mom-to-be has a lovely bouquet to remind her of all of the love and support in this new and exciting role she will have!

Monday, April 23, 2012

Making do: Creating a Onesie Cutout Cookie

Last week I was making cookies for a baby shower at work.  My go-to place for cookie cutters (a small bulk food store close to home) had a cute elephant and I found a neat sun-burst cutter that I decided I would use for a lion to fit the shower's jungle theme.  But I really wanted a onesie cookie cutter.  Being the procrastinator I am, I was shopping 2-3 days before I wanted to make the cookies.  No time for online purchases and shipping (and the inevitable $20 I'd throw in the cart with it).  So I got creative.
Baby Shower cookies
I began with a gingerbread woman cutout (I didn't think a gingerbread man cutout would do as it wouldn't give the little middle piece between te legs). However, I found that using a ghost cutter also worked with a little more hand shaping it actually was less rounded.

To begin: roll your dough and cut out the pieces. You don't need to worry about making complete cookies as you'll be beheading them in addition to cutting off the hands and rounding them out to make the leg holes.
Lots of overlapping pieces to cut down on the amount of scraps to reroll.

Peel away the extra dough and move your cookies away from each other to keep from cutting the others.

Create the collar by rounding the neck with a round cutter.
If necessary, shape to make the onesie cookie straighter.  Then round the leg holes with a round cookie cutter.

Cut off the arms to make cap sleeves.
Bake. Decorate. Enjoy!

Yes, this is several somewhat tedious steps and produces lots of scraps, but for the procrastinator, it works.

Some other things I noticed while working:
Instead of a onesie make a dress! Less cutting. And still super cute. (and less messing up the leg holes).  You might want to trim off the feet in addition to rounding the head and cutting the arms into sleeves.  Have a straight-edged dress or make it riffled with a pastry wheel.

Use a fluted round for frilly neck lines and leg holes to make it a little more girly.

Sunday, April 1, 2012

Hats off to you!: Knit Hat

So my first knitting project is a hat.  I looked around for a basic pattern just to let myself get comfortable knitting in the round and using double pointed needles.

I began with this pattern, but had no idea what size my double pointed needles were.  After comparing them to some other needles, I determined they were probably around a 6.  The pattern called for 4.5 mm (size 7), but I wasn't patient enough to wait until I could go get more needles, so I worked the pattern with a set of size 6 double pointed needles.

The pattern is quite simple, beginning with a basic knit 2, purl 2.

Once I got a few inches in, however, I realized that my hat looked like I got off somewhere.

After some thinking, I discovered the problem.  I would always quit at the end of a row.  When knitting in the round, a pearl stitch looks like a basic garter stitch and a knit stitch looks like a pearl stitch on a basic project.  So I put down my project and when I picked it up again, I looked at the stitches below, not where my flowing piece of yarn was telling me was the last stitch, and flipped the project. In the end it did give the hat a neat little edge.

Another alteration I made to the pattern was I did the initial k2,p2 for 18 cm instead of the called for 22 cm. She flips up the brim in this pattern, but I felt it was long enough and was really excited to begin the decrease and finish my hat, so I figured it would be fine without it.

All in all, the pattern was a nice pattern and turned out great.

However, I love the look of a fine yarn with small stitches, so look for a more refined hat in the future!


The pattern:
You will need:
Size 6 double pointed needles
Worsted weight yarn (this used less than half of a skein of your typical Red Heart).


Cast on 100 stitches amongst three of your four needles. Join, being careful not to twist stiches, and place marker (scrap of contrast yarn or a safety pin is fine).
Rib in “knit 2, purl 2” for 22cm
Then: *knit 2, purl 2-together** Repeat to end of round.
Next round: *knit 2, purl 1** Repeat to end of round
Next round: *knit 2-together, purl 1** Repeat to end of round
Next round: *knit 1, purl 1** Repeat to end of round
Next round: *knit 2-together** Repeat to end of round
Next round: knit
Next round: *knit 2-together** Repeat from until 1 stitch before end of round.
Knit 2-together (five times) – 8 stitches remaining
Cut a tail of about 15cm of yarn. Thread it through 8 remaining stiches and draw tight. Stitch inside hat to secure. Sew in loose ends.