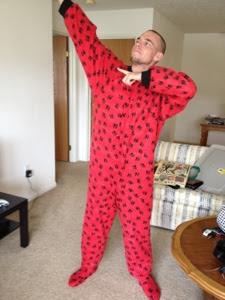
These new pajamas are not just any pajamas. These pajamas are a one-of-a-kind pair of footie pajamas.
 |
| Excitedly awaiting cool nights to wear these awesome jammies. |
So I'll walk you through the process describing the alterations I made to the method.
I began with McCall's pattern M6251 (jumpsuit) and Butterick pattern 5233 (footies).
I cut out the pieces for Jumpsuit E from the M6251 pattern. I cut all the pieces as directed, but cut the neck binding (piece 13) from the same binding material as the sleeve bands (this was done from a personal preference to have this instead of using the same fabric). You do not need the leg band (piece 15) as you will be attaching the footies.
For the footies, cut the pieces for footies E (you do not need the fringe piece- piece 11 or binding). On the back piece (piece 9), I did not cut the notch in the back, but rather cut straight up from the bottom piece since I would be sewing the whole thing together instead of having an open-backed tie shoe.
Follow the jumpsuit directions from 1-10. I skipped step 11 because I thought it looked nicer without the neck binding folded over since I used the rib binding. So I just tucked the edges in and tacked them to the collar to give it a finished look.
Continue with steps 12-15.
Move on to the footies. Follow steps 35-38.
With right sides together, pull the footie over the outside of the leg, lining up the center of the top of the foot with the notch on the front of the leg. Sew this together.
Pull the leg so that the whole thing is inside out. Sew the sole to the bottom, following steps 45-46.
After I was finished I put my feet in to make sure they would work (I wasn't sure what shoe size he was but was convinced it was bigger than mine). I was a little nervous because the feet weren't really big on me, but the fabric had some stretch to it and it worked just fine.
Other words of advice: be careful not to stretch your ribbing too much as it doesn't recover well and will be permanently stretched (another option would be to cut a little smaller to allow for some stretching).
The only other thing I'd consider doing differently is putting something a little more slip resistant on the soles of the feet (my sister told me they make iron on stuff for this? Amazing idea!).
Perhaps the next pair should have a hood on them too. Or an old-fashioned flap in the hind end, just for giggles.


Maybe can add glue dots on the bottom. Read a tutorial on baby shoes they suggested to keep from slidding to write their name on bottom with glue gun.
ReplyDeleteThat's a really great idea!! Would be really helpful for younger kids. So creative!
DeleteThank you for this tutorial! Do you think it'd be very hard to put in a hood and butt flap? Also, I saw someone made zig zag patterns down the feet of their son's footie pj's with fabric glue! :) You can try that next time :)
ReplyDeleteI don't think a hood would be very difficult to put in. I'd just get a sale zip up hoodie pattern to get the piecing right and just sew them right sides together. I'd see what the instructions say as to when to add (before/after the zipper) and just follow those directions at that point.
ReplyDeleteA functional butt flap I think would be more difficult to do- I think there are two ways to do it here- either make the single back pieces into two (cutting the bottom half to include the whole butt flap and the top half lower to overlap it, or cutting a slit into the sewn back and adding an additional flap (which I think might be the more "traditional" way and simpler). But if you're looking for just the visual, just sewing on a finished flap and adding buttons would definitely be the easiest...
Do you mind me asking. How tall are you and what size did you use in the mcalls?
ReplyDeleteThanks
just found pattern quick-sew 2175. used to have footie pj's that opened in back and could lift foot off, to walk on slipperyor wet areas. even the fabric puffy paint might work on bottom of food or that grabber for rugs.
ReplyDeletemake part of crotch with open (like mens undied) or snaps (like baby onsies).
would be nice to have a onsie.
Thanks for photos and instructions
Maybe I missed it. How many yards of fabric did it take to make the pjs?
ReplyDeleteThanks!